Fixing automatic suspend for Linux Mint 17.1 (Cinnamon)

I’m not sure how widespread this problem is, but I notice at least two other people seem to be having a similar issue. The problem is as follows:
You set a time for automatic suspend in the power menu, but after that duration, your computer doesn’t actually suspend. Nothing else is affected – manually suspending/resuming works fine and shows no errors.

The fix is actually very simple. Credit goes to “akspecs” on the Linux Mint forums for posting this, and probably a lot of other people before that.

First, you need to install dconf-tools:
sudo apt-get update && sudo apt-get install -y dconf-tools

Next, launch dconf-editor, either from the menu or by pressing alt+f2 and typing
dconf-editor

You need to navigate your way to org.cinnamon.desktop.sesson, that is,
org > cinnamon > desktop > session
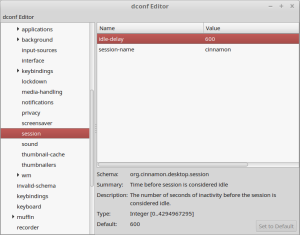
and change the value of idle-delay from 0 to whatever your display timeout setting is (default: 600).

Screenshot of mentioned setting

This is what you need to change to anything other than 0.

That’s it. Automatic suspend will function again. Hopefully this saves someone several hours of frustration.

Ubuntu GNOME 14.04 Automatic Suspend fix

Note: If you’re looking for a way to fix Mint/Cinnamon, with a similar problem, see:
[this post].

The problem:
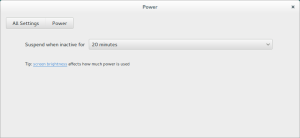
Your computer won’t automatically suspend, despite setting a time in the Power menu.

This menu does nothing at all.

This menu does nothing at all.

The solution:
gksu gedit /etc/systemd/logind.conf
Edit these two lines, like so:

IdleAction=suspend
IdleActionSec=20min

Change the 20min to whatever you want. Reboot and everything is gravy!

[Source]

Adjusting Firefox scroll speed

This is an easy one.

Paste about:config in your URL bar. Press enter, and agree that you won’t break stuff.

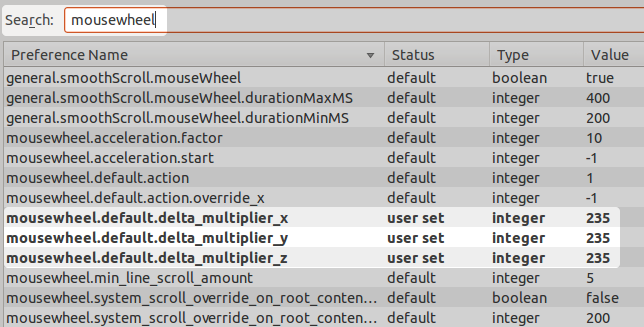
Type “mousewheel” into the search, and edit the value of mousewheel.default.delta_multiplier_x,y, and z.
The default value is 100 (only 3 lines per wheel tick on Linux), but I prefer something around 235.
Screenshot from 2014-06-08 00:19:56

As a bonus, are you used to clicking on the URL bar and having the entire text highlighted? We can change that, too!
Instead of “mousewheel,” just search for “selectsall” and switch browser.urlbar.clickSelectsAll to true.

Complete guide to configuring your touchpad with Linux

An updated post, with instructions that should be relevant for many years.

So, let’s get right to it.

Unity, GNOME, and Cinnamon users: disable the built-in touchpad settings like so:
sudo apt-get install dconf-editor
Press Alt+F2 and launch dconf-editor
Navigate to org.gnome.settings-daemon.plugins.mouse and uncheck the Active box. [1]

Now the fun part. In a terminal, run synclient -l to see a list of options for your touchpad.
You can test different settings immediately by running synclient Option=Value, for example: synclient MaxTapTime=400

To make settings persistent across reboots and suspend/resume, you need to add these desired values to a config file, like so [2]:
First off, we need to make the correct directory, because it doesn’t exist yet.
In a terminal, run:
sudo mkdir /etc/X11/xorg.conf.d/
Next, you need to edit the file where we’re going to store these options, so run from a terminal:
sudo nano /etc/X11/xorg.conf.d/50-synaptics.conf
or, if you prefer a graphical editor:
gksu gedit /etc/X11/xorg.conf.d/50-synaptics.conf
And paste this template inside:

Section "InputClass"
        Identifier      "Touchpad"                      # required
        MatchIsTouchpad "yes"                           # required
        Driver          "synaptics"                     # required
        Option          "MinSpeed"              "0.5"
EndSection

Of course, the option MinSpeed was left in as a guideline for adding your own options. It’s not required, so just replace it.
Any options that you don’t specify will be their default value, so don’t worry about specifying every option, only the ones you want to change.
When you’re done, save this file and logout or reboot to see your configuration in effect.

In some cases, even after following the above advice, your touchpad may ignore the options seemingly at random – if this happens to you, don’t worry, we can fix it by editing one more configuration file.
This time, open up /usr/share/X11/xorg.conf.d/10-evdev.conf with your favorite editor.
Comment out the section that deals with “touchpads,” like so:


...

#Section "InputClass"
#        Identifier "evdev touchpad catchall"
#        MatchIsTouchpad "on"
#        MatchDevicePath "/dev/input/event*"
#        Driver "evdev"
#EndSection

...

Save the file and reboot, and you should be all set.

Wasn’t that easy? Well, it’s a big step in the right direction for anyone running GNU/Linux on a laptop. I’d just like to share a couple configurations that I’ve set personally, for two laptops that I’ve used:

Sony VAIO VGN-NR110E:

Section "InputClass"
        Identifier      "Touchpad"                      # required
        MatchIsTouchpad "yes"                           # required
        Driver          "synaptics"                     # required
        Option          "MinSpeed"              "1"
        Option          "MaxSpeed"              "1.8"
        Option          "MaxTapTime"            "320"
        Option          "RTCornerButton"        "0"
        Option          "RBCornerButton"        "0"
        Option          "LTCornerButton"        "0"
        Option          "LBCornerButton"        "0"
EndSection

Dell Mini 110:

Section "InputClass"
        Identifier      "Touchpad"                      # required
        MatchIsTouchpad "yes"                           # required
        Driver          "synaptics"                     # required
        Option          "MinSpeed"              "1"
        Option          "MaxSpeed"              "1.75"
        Option          "FingerLow"             "40"
        Option          "FingerHigh"            "45"
#       Option          "VertHysteresis"        "20"
#       Option          "HorizHysteresis"       "20"
        Option          "VertResolution"        "85"
        Option          "HorizResolution"       "55"
        Option          "TapButton2"            "3"
EndSection

If you get your touchpad working perfectly as well, why not share your configuration? Just post it in a comment along with the laptop model and it will surely help other users.

Screensaver activating while watching media

Note: this information is outdated. The new versions of Caffeine activate automatically for all fullscreen applications, and has no manual toggle/preferences dialog.

Been watching something and had the screensaver activate? Here’s how to work around that.

First, install Caffeine:

sudo add-apt-repository ppa:caffeine-developers/ppa

sudo apt-get update

sudo apt-get install caffeine python-glade2

Now open it by navigating through your menus to find “Caffeine Preferences.”


In my case, I added SMPlayer, but you can add what you want. When you open the program you should see the icon change after a few seconds and then revert when you’ve closed it. It doesn’t work automatically with Youtube (at least for me), but if you plan on watching a video longer than your screensaver setting you could always just toggle Caffeine from the system tray.

To change the Caffeine icon, head over to gnome-look.org and search for “caffeine” under Gnome Icons. If you downloaded some .svg icons, you’ll have to open them with GIMP and export them as 22×22 .png files, named caffeine-cup-empty.png and caffeine-cup-full.png. Overwrite the files in /usr/share/icons/hicolor/22×22/status and you’re done!

sudo cp caffeine-cup-empty.png /usr/share/icons/hicolor/22×22/status


sudo cp caffeine-cup-full.png /usr/share/icons/hicolor/22×22/status

Source

How to: Mic boost in GNU/Linux?

Is your mic extremely quiet in everything you’ve tested? Here’s how to fix it.

Run in terminal:

sudo alsamixer

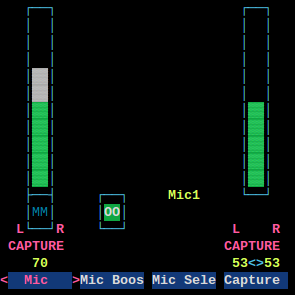
alsa mixer example

Not the prettiest thing in the world…

Press F6 if you need to select the correct soundcard.

Then press F5 to view all options. Use the directional arrow keys to navigate around.

Your first order of business is finding the option labelled “Mic Boost.” Highlight it and press “M” on your keyboard to toggle the Mute status. The little blue “MM” should become a green “00.” Next find the Mic option near Line and CD. I have mine set to 4.50dB gain (use the up and down arrow keys to change it). Make sure it says “MM” underneath it, so you don’t get feedback through your speaker/headphones. And finally, head over to the option labelled Capture near Mix and Mix Mono. I set mine to a gain of 12db. These settings are pretty good for a desktop microphone located about 1.5ft from your head. You’ll need to use lower values if you use a headset or clip-on mic.

mic settings

Now press ESC to exit.

Run

sudo alsactl store

Just to be safe. Now you’re done. Go enjoy your mic boost!

How to: setup Redshift to be like f.lux

Updated 2/8/2016: new package names, edited for clarity.

Ever used f.lux? Well, there’s an open alternative that works just as well, called Redshift.
To install it on *ubuntu, just run:

sudo apt-get install redshift-gtk

On Arch, the package is just “redshift.”

First thing we need to do is find your latitude and longitude. To do this, go to http://itouchmap.com/latlong.html and enter your general location. For this guide I’ll be using NYC, which shows up as 40.714353,-74.005973.

Open a terminal and run:

redshift-gtk -l 40.71:-74.00 -t 6500:3700

substituting

40.71:-74.00

for your latitude:longitude, of course.

Press ctrl+c to cancel when you’re done.

If you ran this at night you should see the display change colors. If you ran it during the day and nothing happens, that’s exactly how it should work. The -t switch defines a daytime temperature (6500k) followed by a nighttime temperature (3700k). At 6500k your monitor color shouldn’t change, while at 3700k your display should change to a red/orange color.

Now just add the command to your application autostart menu and you’re all set. (ex: Click menu -> type “startup” and add the command there). And reboot or logout/login.

Source: man redshift

Fixing odd laggy behavior with FGLRX

Update (3/10/2014): this post is here for historical value, as the new drivers from AMD have the vsync bug fixed.


  • Scrolling on Chrome or Chromium will sometimes continue to scroll the page a second after you stopped physically scrolling (this is the main debug point for me).
  • Weird slow behavior when dragging windows around, scrolling through things, just about everything seems weird (minor graphical glitches and delays).

This happens to me with a Radeon HD 6770. I’m not sure what other product lines it affects if any, since there’s very little information to go on.

The main problem here is with Tear Free Desktop in the Catalyst Control Center.

I have some solutions and some semi-solutions and some downright bad advice.

First, let’s bring up the situation with Ubuntu.

Ubuntu 12.10 [Unity] (bad solution): Use the open source driver that comes with Ubuntu 12.10. It’s loud and hot and slow, but it’s the only way to get windows to move around smoothly and scrolling to not be jerky. If you installed 12.10 to play Steam games, I would personally recommend installing a different desktop (sudo apt-get install xubuntu-desktop for example) and looking at the solutions below. If you don’t care how slowly your windows move around you can try the 12.04 solution, but there may still be problems and I didn’t test it extensively.

Ubuntu 12.04 [Unity] (semi-solution): Disable Tear Free Desktop in the Control Center with sudo amdcccle and enable “Always On” [vertical refresh] under More Settings in the 3D options. If you’ve disabled vsync in the OpenGL settings through Compiz Config then go back and enable it. Result: Smooth window movement, nothing jerky and few graphical glitches… however, tearing at the top half of the screen (only in Compiz, as far as I know).

Next, let’s talk about non-Unity/Compiz desktops.

XFCE (solution): The key here is to enable compositing. Go to Settings -> Window Manager Tweaks and the Compositor tab. At a minimum select “Enable Display Compositing” and “Display fullscreen window overlays directly.” Now you can enable the Tear Free Desktop setting in the Catalyst Control Center and you’re good to go.

LXDE/Awesome/Mate/whatever (solution): Once again, you need compositing. If you can, I would suggest installing a very recent build of “Compton” and running/autostarting it with something like “compton -Gf -D 2 –vsync opengl”. With the vsync switch you shouldn’t need to enable Tear Free Desktop, but you should enable “Always On” [vertical refresh] under More Settings in the 3D options.

Gnome-shell/Cinnamon (solution): Disable Tear Free Desktop and then enable Always On [vertical refresh] under the 3D options of Catalyst Control Center. Gnome-shell and Cinnamon worked very well without changing any settings at all from the default fglrx install for me.

KDE (solution): Same for Gnome-shell and Cinnamon, it should work by default unless you’ve messed with the Tear Free Desktop option. See the solution above.

Changing Opera scroll speed on Ubuntu

Sure sucks to scroll 3 lines at a time, right?

The suggested fix is:

Go to Settings -> Preferences -> Advanced tab -> Shortcuts on the sidebar -> highlight Opera Standard and press Duplicate… -> highlight Copy of Opera Standard and press Edit… -> press New…

Enter Button4 and Scroll up, 6 in the dialog.

Enter Button5 and Scroll down, 6 in the dialog.

Where “6” is the number of lines you wish to scroll.

This worked a few versions ago but for some reason when I press “New…” the button does nothing. Since this happened on multiple computers with different distributions, I’m guessing the same probably happened for you as well. Not to worry.

The file that these actions would edit is located in /usr/share/opera/ui/standard_mouse.ini.

Open a terminal (ctrl+alt+t)

Before editing the file you should make a backup:

sudo cp /usr/share/opera/ui/standard_mouse.ini /usr/share/opera/standard_mouse.ini.old

Now paste in

sudo gedit /usr/share/opera/ui/standard_mouse.ini

Scroll down to find the “Button8” and “Button9” lines, and directly below them with the same formatting, paste in:

Button4 = Scroll up, 6
Button5 = Scroll down, 6

As shown: 

Press ctrl+s or go to File -> Save and close gedit.

Close and reopen Opera and you’re good to go.

If something should go catastrophically wrong, restore the backup file with:

sudo cp /usr/share/opera/standard_mouse.ini.old /usr/share/opera/ui/standard_mouse.ini

Happy scrolling!

Source

Fixing ALPS touchpad double tapping and dragging on Ubuntu

This post is for historical value, an updated guide is posted here. Check that out instead. The option you wanna change is MaxTapTime.

  • You installed (x)/(k)/(l)/Ubuntu on your laptop with an ALPS touchpad
  • Everything works except dragging by double tapping, because it expects you to tap faster than possible

This is an easy fix that was fairly difficult to discover.

Open a terminal (ctrl+alt+t) and paste in:

synclient MaxTapTime=400

Now try tapping and dragging, and you should see that it is much more reasonable. 400 represents a value in milliseconds as the allowed time between taps. By default, I believe it’s around 110, which is inhuman. After playing around with it, I ended up with a preferred value around 240ms. This seems to be the sweet spot where you don’t double tap on accident and it still works as intended.

To autostart  on Ubuntu and Xubuntu respectively:

  • Open the dash and type “start” and open the Application Autostart menu. Paste in synclient MaxTapTime=240 for the command, and whatever you want for the title and description. Apply changes and exit.
  • Click the menu and go to Session and Startup. Paste in synclient MaxTapTime=240 for the command, and whatever you want for the title and description. Apply changes and exit.

Source/more information

Tested on Ubuntu and Xubuntu 12.04 and 12.10